Sunday, December 25, 2011

Merry Christmas

Merry Christmas!!!


I hope your Christmas is filled with love!

Thursday, December 22, 2011

Pesto Sausage Squash

So, I have to brag, I TOTALLY rocked it in the kitchen last night! I have always thought of my self as a pretty good cook. But WOW, I have to tell you, last night was a topper.

Ingredents:
1 Spaghetti Squash
1/2 White Onion (cut in long pieces)
15 Baby Carrots (cut lengthwise then into 1/3s)
Package of Turkey Sausage (6 brat sizes links)
Pesto
Extra Virgin Olive Oil
Water


Prepare your squash as you would normally. There are many different ways of doing this, I favor the microwave option.


Cut up your sausage into five pieces each brat.


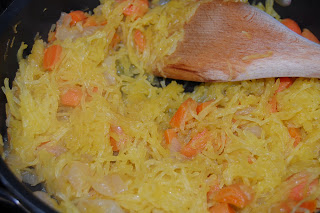
Saute' the onions until soft, add the carrots. Let them get a little wrinkly then add about 1/2 cup water and boil until carrots are soft. Let the water cook away. If you need to add more water, then go head. After the water is gone, add the squash and mix. Set to low and cook your sausage, stir occasionally.


Add the sausage to their own frying pan and brown the outsides. Add a cup of water and boil them until the middles are no longer pink. I have used the sweet turkey sausage.


Place the squash into a bowl and coat with the pesto. I have not given a measurement to the pesto because it is all about taste. If you like a lot of pesto, add a lot. I took a small forkful and placed it in bowl with a little pesto and tasted it until I got it just right. No need to ruin the whole meal if you are not sure what will taste good to you. Use a small serving bowl to help you.


Crescent Rolls

Pre-made Crescent Rolls
Shredded Cheese
Oregano
These are SO good and SO easy!

Take your pre-made crescent rolls and place them on a cooking sheet.


Sprinkle a little Oregano and cheese on top each then bake as directed.


I love doing this because if you use pre-made rolls, add a little something to them and they taste fresh and completes your meal.


I have been told that this meal does not look the tastiest, but I can promise you that it does not taste as it looks, I was a little scared at first, I even had to talk my daughter ( who is like Mikey) into trying it. She loved it as well.

Now, my husband was the clincher. When I make spaghetti squash, what he says is this, "Thank you for making something I do not like into something I can eat." I will take it as a compliment, if you don't like something but I can make it into something you can eat, it works. But, with this meal, he said it was good, had seconds and even took the left overs to work. Now if that isn't the best compliment on a food he does not like, then I do not know what is.....lol!

Enjoy!

Wednesday, December 21, 2011

Dradel

Dradel

Items needed:
Craft Sticks
Hot Glue Gun
Markers
Pom poms
Other decorative items


Glue 11 to 12 craft sticks together lengthwise and then one to two sticks on back for support.


Glue a stick across the top and one across the bottom of the front of the dradel.

Glue two to make an upside down house.


Take to more and glue lengthwise and then glue to the top of to the square in the middle for the handle.


Then let the kids go crazy decorating it. You can add string to it and hang it on the wall.
My daughter had a blast decorating this one!


Tuesday, December 20, 2011

Happy Hanukkah

Happy Hanukkah!!


I do hope that the next 8 nights bring great family, friends and love!

Menorah

I am always thinking of new things my kids can do for the holidays. With them being half Jewish, I need to find fun things for them to do for Hanukkah as well. So, I have been brainstorming and came up with a few ideas. Here is one.


Menorah


Items needed:

Popsicle sticks

Markers or paint

Hot glue gun

Pom poms

Foam stickers


I like to use markers just because paint is too messy. I love my kids doing crafts, but they are not clean and make huge messes. So to save some trouble, I just have them use markers. Works the same and faster at drying.


I start with the stand and glue the sticks together lengthwise and then glue a stick on the back to glue the two sets together as well as having support. I do use hot glue just because regular glue will not always hold up and sometimes a kid will cry and through a fit if one of their projects breaks. So, I will bare the burns and blisters of the hot glue.


Do the same for the center. Glue 4 lengthwise then two sticks on the back for support.


Then the top. There are 6 sticks, but having them end on end would be too long. In the next picture you will see what I have done to get the extra space you need for the 9 candles and not have it too long.


I took a 2- 1/2in x 3/8 in craft stick (Not nessecary) to make the center candle taller, not by much. Then glue the crap out of it to make sure it would stay.


And there is the finished product. I cut the flames out of yellow felt, but you could use anything that you have on hand. Even white paper and markers.


The kids holiday crafts will always get hung on the wall for the season, so I really LOVE these little hooks. They work wonders. But I have noticed that the larger ones will rip the paint off. So I always stick with the smallest ones that I can.


For ever night we are glueing on the flame. This helps the kids get a little more involved with the actually prayer and candles without fear of injury.


Sunday, December 18, 2011

How Theft Showed Me My Happiness.

10 years ago my husband and I spent our first Christmas together as a married couple. With him being Jewish, he did try to weasle his way out of it because he had never done Christmas before. But it is gift giving, not rocket science.

On Christmas morning we woke up and went to the tree. After we enjoyed making each other laugh, surprised and happy, I had old him that a few of his stocking stuffers were technically stole. I had explained to him that when I went shopping, a few of the small magnets I got him where hidden and after getting home I realized they were not on the recept. Now, I am not one for condoning stealing, but I had just spent over $300 in that store and figured 2 $2 magnets where not going to matter much. It was an accident and I did not want to drive back to the store.

So, the years following that where for the kids, sadly we had stopped exchanging gifts and left it all to Santa and the smiles of our children. Plus, lack of money did not help. But this year, he is home, we had extra money, so I decided to give my husband a few gifts. After shopping one last time I had told him that ended up with 5 inexpensive gifts for him, three for Hanukkah and two for Christmas.

Him: "How inexpensive?"

Me: "I don't know, I may have spent $75 total on all your gifts. Why?"

Him: "So you did pay for them then?"

I was stunned that after ten years, that came back to haunt me. We had an awesome laugh, which reminded me of how much I adore my life and how far we have really come. It reminded me that my life is short and I only have one. That there has been many, many bumps, but in the end, it has been an amazing ride.

Odd how a ten year theft could show me all that, but with a little Christmas magic and tons of love, little things can show you the most.

Thursday, December 15, 2011

Greatest Idea Ever

Ok, this is the world's greatest idea! I found this on pinterest. I looked up and down for the site I found it on and cannot find it to give the credit do. We I find it, I promise to post it. If you know you can also comment and I will be sure to post it.

But I just had to share it, because who does not get these hangers and then just throw them away or they clutter things up? I have TONS of these and have despised them for years. NOW, I keep them and have tons of clips for cereal, chips, crackers, and more!

I took my tin snips and cut of the clip part of the hanger and your done. Nothing to it!

I wish I would have thought of this years ago!

Goodbye My Friend

My daughter's best friend is moving away and wanted to give her a gift. With it so close to Christmas, I thought it was an amazing idea. I did want to give her something that meant something and was not going to make the parents feel bad about not giving my daughter anything. So we decided to make her something.

Their preschool class recently put on a Christmas show, so I took a picture of our girls together and printed it up and let my daughter make a picture frame for it. She had so much fun.

Hot glue gun
Popsicle sticks
Markers
Pom pom


First thing we did was glued 3 popsicle sticks together lengthwise.


Then we hot glued one stick across two sets to hold them.


Glue them all together to make a frame.


Have your child color it with markers or crayons or let them paint them. We hot glued the pom pom on them and them tied a string to it so they can hang it on thier Christmas tree or a nail in a bedroom.


I let my daughter sign it and them I glued a stick across the back as well so the I did not have to glue the picture in it and they can change it out as we send them more pictures in their pen pal letters.


How cute is this? I had all the supplies so it only cost me about $2.36 for the printing of the picture. Inexpensive gift for a friend to remember you by.

You can of course use any crafting supplies to this, such as glitter, gems, eyelets, buttons, anything you have around the house. I am sure that everyone has done something like this when they were younger. It is a timeless kids crafts and a wonderful way to show someone that your child cares for them.

Friday, December 2, 2011

Christmas Garland

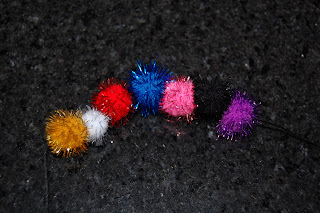
We have moved this past year into our own house and we have become lazy at unpacking and when I decided to get my Christmas stuff out, I could not find most of it at first. So I had decided to make my own garland for the tree. Little did I know that this project could become a little pricey with the cost of all the pom poms. But honestly, I think it was well worth it. I have fallen in love with my new garland and plain on making more in the years to come.

Items Needed:
Thin yarn
Needles
Pom poms


I do apologize for not quite being able to see the yarn. But I promise it is there....lol.


String the yarn through your needle and grab a pom pom and stick the needle through the center. Some of the centers are hard to get through, but if you do not get as close to the center as possible, the pom pom can rip off.


Thread them together in any pattern or not one at all I like I did. I did not want a pattern, just as long as I did not put two colors together.


String and hang on your tree. I placed them kind of close so you can see them without having to search a picture of the tree to find it. I had fun doing this project and I was able to do it while I relaxed at night watching tv with my husband before bed.

Thursday, December 1, 2011

Salt Dough Ornaments

Every year I try and make something for the rest of my family and I always choose ornaments, so that every year they can pull them out and remember how much I love them. I have always wanted to try to make Salt Dough Ornaments, but never had the time until now. I see these recipes floating around all the time durning the holidays. I looked at many, many different recipes and they were all the same, some had small differences, but nothing to dramatic. This is the recipe I came up with after my search and trials.

2 cups flour
1 cup salt
1 cup water (room temp)

Place these three ingredients into a large bowl and mix. I mixed by hand and it did not become too tough.


Place flour down and roll flat. About a 1/4 inch, just like you would with roll out cookie dough.


Use cookie cutters to cut out your designs. I used a screwdriver to make the holes for the ribbon to hang them from.

You bake them at 200 degrees for 4 to 6 hours. I saw different times and temperatures, but this one was the one that seemed to work the best for me.

Be careful you do not make them too thin or the centers will bow and too thick will never finish.


I went to the store and bought a plastic leaf and cut of a small portion of it and lightly rolled it in to the ornament. Remove the plant and you get a beautiful impression of the plant and it will bake into it. I also made some and used out leather stamps and lightly pressed in letters for my sons Cub Scout Pack's Christmas party.

You can add food color, glitter, or whatever you think you would love to see in them.


After taking them out of the oven, let them sit and cool like you would for a cookie. When they were cool, I took the screwdriver and put it back through the hole. They may close up a little while baking.

Paint, string, and your done. Give them as gifts, hang them on your tree, or use them as gift tags!